
Introduction
Adding an epoxy coating can enhance your house’s durability, appearance, and overall worth. Whether in a busy city or a quiet suburb, upgrading your garage flooring Seattle can make a significant difference. Garage floors experience significant wear and tear from vehicles, foot traffic, and storage items. Applying an epoxy coating can enhance the appearance of this often-overlooked space and add a protective layer that resists stains, chemicals, and abrasions. This guide transforms your garage floor into a durable, attractive surface.
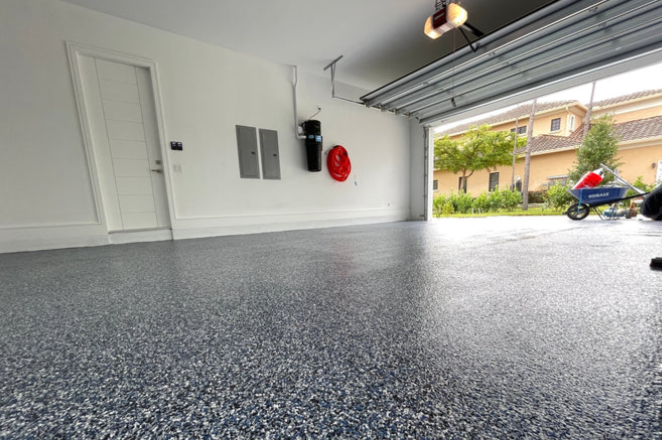
Benefits of Epoxy Flooring
Epoxy flooring offers numerous advantages, such as enhanced resistance to stains and chemicals, a more polished and professional look, and improved longevity of your garage floor. Epoxy coatings can increase the lifespan of concrete surfaces by up to 10 years. The durable, protective layer formed by epoxy is a seamless shield against moisture and bacteria, making it a top selection for residential and commercial garages.
The benefits extend beyond durability. Epoxy floors are also highly customizable, allowing homeowners to choose colors, patterns, and textures to match their aesthetic preferences. Moreover, the reflective surface of epoxy can significantly enhance the lighting within the garage, making the space more usable and inviting. The added light can be particularly beneficial for activities such as DIY projects or car maintenance, where good visibility is essential.
Preparation and Planning
Preparing your garage for an epoxy coating involves thorough cleaning, repairing cracks, and ensuring the surface is completely dry. Planning also includes gathering the necessary tools and materials. It’s essential to take these steps seriously to ensure a successful application. Begin by emptying the garage and removing any objects that could obstruct it. A clean, clutter-free workspace will allow for more accessible applications and better results.
Once the garage is clear, focus on cleaning the floor. Sweep away debris and use a heavy-duty degreaser to eliminate oil stains or contaminants. For stubborn spots, a pressure washer can be particularly effective. After cleaning the floor, inspect it for cracks or damage. Use a concrete patching compound to fill these imperfections and allow it to cure completely. Remember, the quality of your epoxy floor heavily depends on how well you prepare the surface before application.
Step-by-Step Application Process
Step 1: Clean the Floor
Start by clearing the garage and sweeping away all debris. It’s essential to ensure every inch of the floor is spotless because any contaminants can affect the adhesion of the epoxy. Mop the floor to remove dust, and use a degreaser to tackle oil stains. Take your time with this step, as a clean surface is fundamental to the success of the epoxy application.
Step 2: Repair Any Damage
Inspect the garage floor for any cracks, chips, or other imperfections. These should be repaired before applying the epoxy. Use a concrete patching compound to fill cracks and holes, allowing sufficient time to dry and cure. Properly repairing these imperfections provides a smooth surface for the epoxy and extends the life of your garage floor.
Step 3: Etch the Surface
Etching the concrete is crucial for the epoxy to bond effectively. Following the manufacturer’s instructions, use an etching solution to create a textured surface. This texture allows the epoxy to adhere better. Once the etching solution has been applied, washing the floor with water is important to eliminate any leftover chemicals and allow the floor to dry thoroughly. Skipping or not doing this step adequately can lead to peeling and poor adhesion.
Step 4: Apply Primer
Priming the floor will ensure better adhesion and longevity of the epoxy coating. Roll on the primer evenly and let it dry according to the manufacturer’s guidelines. The primer serves as a foundation that fills up any remaining gaps in the concrete. This step is crucial for porous concrete floors, where proper adhesion might otherwise be a challenge.
Step 5: Mix and Apply the Epoxy
Observe the guidelines in your epoxy kit for combining the resin and hardener. Once mixed, start applying the epoxy from the farthest corner of the garage, working your way toward the exit. Use a roller for an even application. Be mindful of the pot life of the epoxy, which is the duration it remains workable once mixed. Apply the epoxy swiftly yet carefully to ensure an even coat.
Step 6: Allow to Cure
Follow the manufacturer’s recommendations for the epoxy’s curing process, which could take anywhere from 24 to 72 hours. Avoid stepping on or placing any items on the floor during this time. Curing correctly ensures the epoxy achieves its total hardness and durability. Patience is vital at this stage; prematurely using the floor can compromise the entire project.
Maintenance and Care
Proper maintenance is crucial after your epoxy coating is applied. Regular cleaning with a pH-neutral cleaner and periodic inspections for chips or damage will keep your floor looking new. For minor damages, epoxy repair kits are available that can fix minor issues without having to redo the entire floor. Replacing mats or rugs in high-traffic areas is also advisable to minimize wear and tear.
Maintaining your epoxy floor can be straightforward if you stay on top of it. Consistently sweeping and mopping the floor will preserve its shine and avoid accumulating dirt and grime. It’s also beneficial to immediately clean up spills to prevent staining, especially from harsh chemicals or oils.
Frequently Asked Questions
- Q: How long does an epoxy floor last?
- A: Properly maintained, an epoxy floor can last 10-20 years. The durability can vary based on factors such as the quality of the epoxy, the amount of traffic it is exposed to, and the upkeep it receives.
- Q: Is epoxy flooring slippery?
- A: While epoxy flooring can be slippery when wet, additives can be mixed to provide a non-slip surface. Depending on your needs and safety preferences, these textures range from mild grit to more aggressive non-slip additives.
- Q: Can I apply the epoxy myself, or should I hire a professional?
- A: Although you can attempt a DIY project, hiring a professional guarantees a seamless outcome and saves time and energy. Experts have the required tools and skills to address any unexpected problems that may arise during the application process.
Conclusion
Applying an epoxy coating on the floor of your garage is a way to invest in appearance and strength. By adequately preparing and paying attention to details, you can turn your garage floor into a durable surface that will last for years. Whether used for parking vehicles, as a workshop, or as a storage area, an epoxy-coated garage floor can significantly improve the functionality and appearance of this essential space in your home.